

![[How-to-] Manage Recurring Orders in EZRentOut](https://ezo.io/wp-content/uploads/2016/05/How-to-Manage-Recurring-Orders-in-EZRentOut.png)
EZRentOut keeps its fingers on the pulse of the rental industry. Our customers tell us they find the periodic and automatic invoicing of long-term rentals to be a challenge. This is why our Recurring Orders feature enables you to set up recurrences for items that have been lent out for long periods, generating invoices at regular pre-determined intervals in the rental cycle.
1. Who needs Recurring Orders?
Say, you rent out assistive technology such as wheelchairs or transfer devices to customers for as long as they have a need for it. For rentals such as this – which span a substantial amount of time – charging payment at the end of the rental cycle is not helpful. This is because it results in cash flow problems if all the money is tied up in long-term contracts.
Additionally, the risk of Customers defaulting on payments increases over time. Creating new Orders manually each time can be a substantial drain on company resources. EZRentOut addresses these problems by enabling businesses to add recurrences to Orders automatically. This lets you split up the total amount payable over smaller periods. The Customer will also be notified about the impending payments each month.
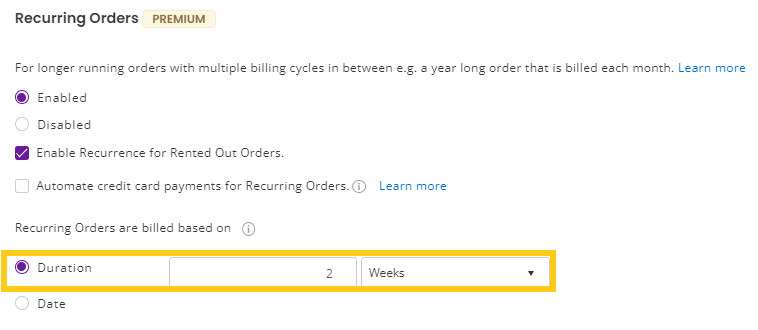
2. Setting a default Recurrence Duration
Before you begin, you’d want to enable Recurring Orders and set a Default Recurrence Duration – that is, specify how often you’d want to shoot an invoice into the system by default. New Orders can be generated at whatever interval you’d like. This can be changed at any time, and will not affect previous Orders created with a different default duration.
To enable Recurring Orders and change the Default Recurrence Duration,
go to Settings → Add Ons → Recurring Orders.
3. Setting up Recurrence on an Order
To begin, click ‘Add Order’. After you pick a Customer and create a Draft Order, you can add items to your Order like you always would. Of course, you could start on an existing Draft Order directly from the Order Details Page, too.
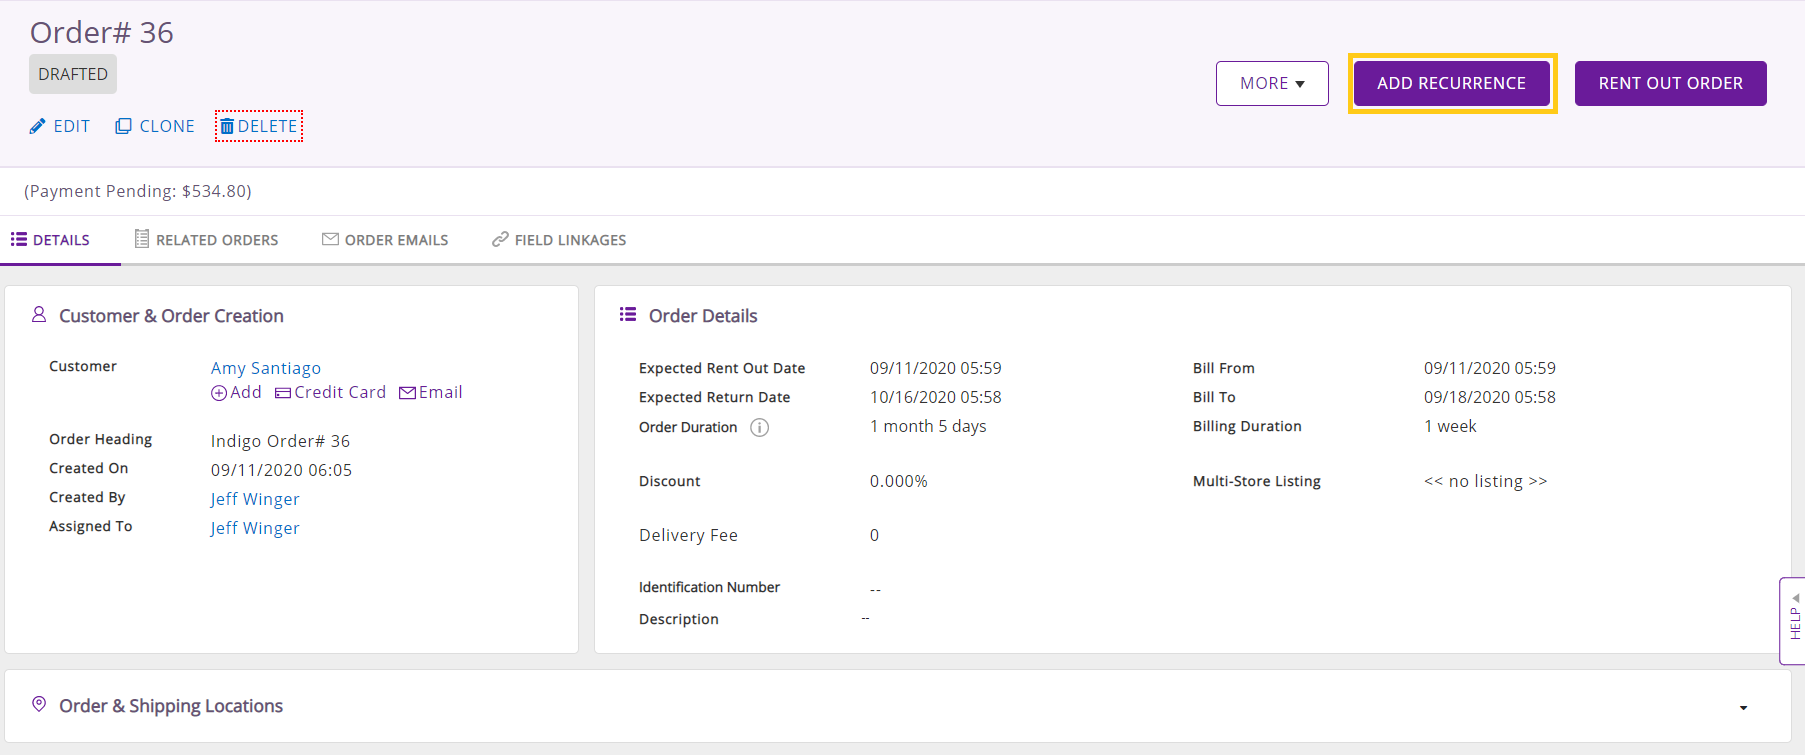
When you’ve finished, click the ‘Add Recurrence’ button on the right. As simple as that, you’ve created a recurrence on an Order! All the basic Order fields, custom fields, and Order Line Items will be directly copied over to all subsequent Orders. Of course, the Order Number itself will be different for each of these ‘occurrences’. There have to be at least 2 occurrences for the recurring Orders to be set up.
4. When does billing recur?
Your billing will recur based on the setting you choose. To change this, go to Settings → Add Ons → Recurring Orders → Recurring Orders are Billed Based On.
You have two options for billing:
- Recurrence by Duration: This will cause billing to recur based on a set duration. You can choose between Days, Weeks, Months, and even Years.
 It is important to note that by choosing a Duration, your billing gets calculated from the time set in the ‘Starting From’ Date. Say, an Order starts at 09:00 am and has a weekly recurrence. A new recurring order will, therefore, be created at 09:00 am the next week.
 - Recurrence by Date: This will cause billing to recur on a specific date every month. You can choose between the 1st and the 28th of every month, or pick ‘End of Month’.
 With the ‘End of Month’ option chosen, one round of billing will end at 11:59 pm on the last date of each month (whether it’s the 28th, the 31st, or anything in between). The new recurring Order will, therefore, start on the 1st of the next month, at midnight. With any other date chosen, the new recurring Order will start on that very date, at midnight (00:00). This setting can be changed for individual Orders by going to the Order Details page and changing the ‘Billing Duration’ field:
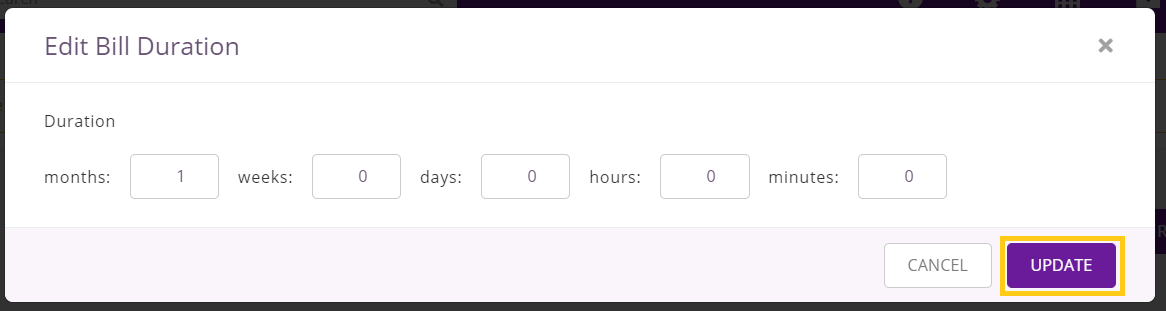
- Note: You cannot set Recurrence by Date if you’ve enabled Variable Months in your EZRentOut Settings.
5. How does Recurrence work?
In the example below, we’ve rented out a Beach Photoshoot Bundle for 1 month and 5 days, with the recurrence duration set to a week. Automatic invoices will be generated in the form of fresh Orders every week for the next five weeks. Of course, you can change the recurrence duration manually from the Order Details page, including tweaking other details such as the start and end date of the rental contract. To enforce the recurrence, you must click ‘Add Recurrence’ when you’re ready.
Then, click on ‘Rent Out Order’.
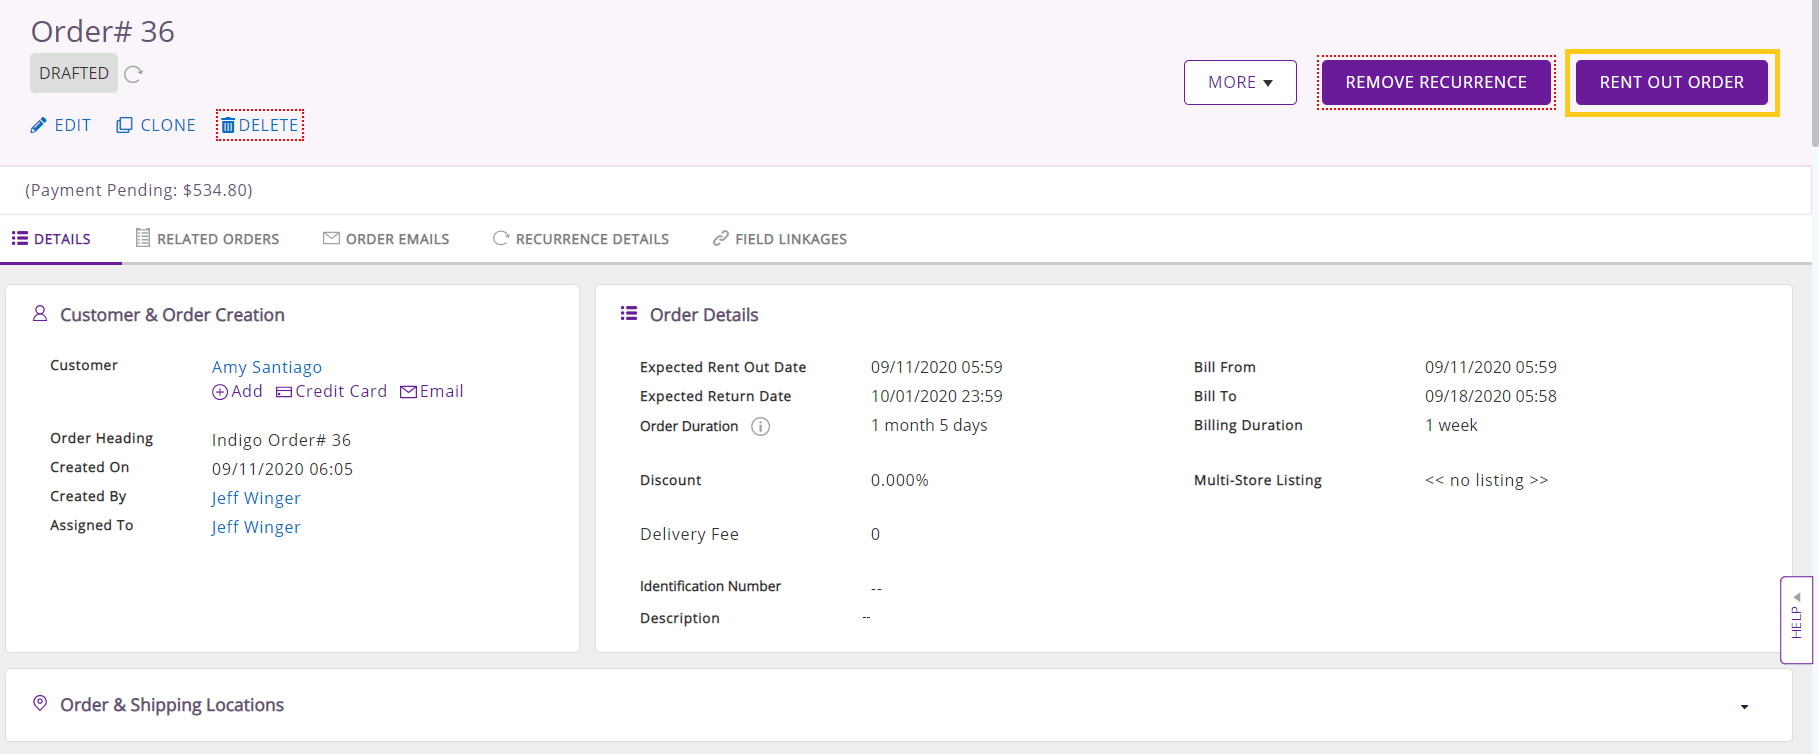
The system should then ask you to confirm both details.
Please note that you will not be able to make any changes to an Order once it is in recurrence, that is when it is ‘Active’.
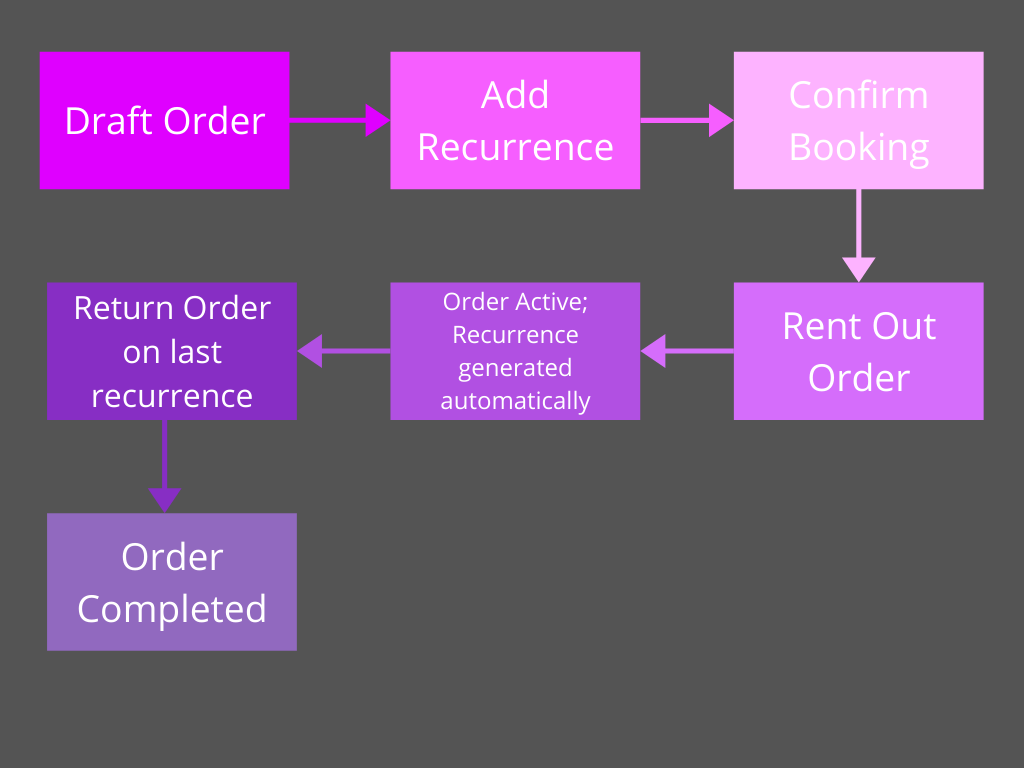
Although each recurrence automatically gives way to the next, the very last recurrence has to be manually completed by clicking the ‘Return Order’ button. This will formally conclude the recurrent Order, marking it as ‘Completed’ in the history. You can also create recurrent Orders retrospectively, just like you would any normal ‘Past Order’.
6. Auto-charging Recurring Orders
Recurring Orders can also be automatically charged to credit cards at the beginning or the end of a recurrence period. This makes convenient payments possible for Customers when they opt for long-term rentals.
Enable ‘Automate credit card payments for Recurring Orders’ under the Recurring Orders Add On.
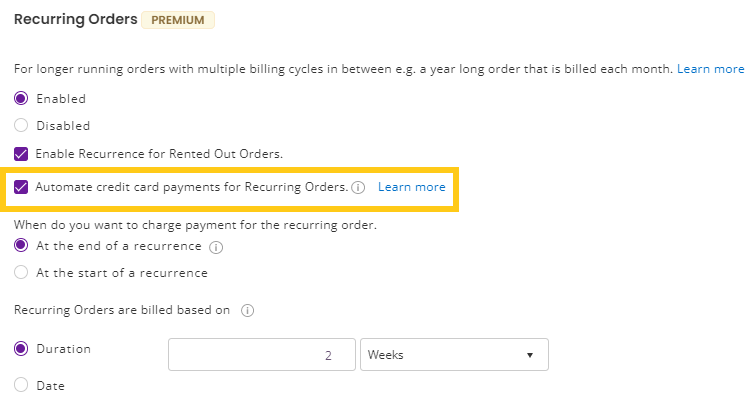
Once the checkbox is enabled, you’ll see additional options to choose when to charge the payment. Let’s explore an example:
You have a 12-month rental starting on the 1st of January 2019. The recurrence period is 1 month and the rental rate for each month is $100.
- Payments at the end of a recurrence: Payments will be charged to the credit card at the end of each month. $100 on the 31st of January, then on the 28th of February, and so on.
- Payments at the start of a recurrence: Payments will be charged to the credit card at the beginning of each month. $100 on the 1st of January, on the 1st of February, and so on.
7. Stopping vs. removing a Recurrence
When the Order is in the draft or booked state, the recurrence doesn’t kick in. It comes into play when you rent out an Order. So while an Order is not rented out, you can remove the recurrence if:
a. Recurrence isn’t needed any more.
b. You want to redo the recurrence by starting over.
When you rent out an Order that has a recurrence attached to it, new invoices are automatically created as per the frequency you’ve chosen. At this stage, you can stop the recurrence, if/when needed.
Say, you have furniture rented out to a family on a 9-month lease with monthly payments. And they leave the city after spending only 3 months. In this case, you can stop the recurrence so that the invoices don’t shoot for the next 6 months. You can then return the uncompleted Order to mark the furniture returned.
8. Marking items ‘Returned’ once the contract is completed
The first and the last Order in a recurrence need manual intervention; the first Order needs to be rented out to start the recurrence. Similarly, the last order in the recurrence needs to be returned to identify the items as “returned”. Orders other than the first and last one are automatically created and returned. You just need to receive payment against them. Also, a Recurrent Order cannot be made void. To sum up, here’s the basic Recurring Order workflow:
9. The ‘Recurrence Details’
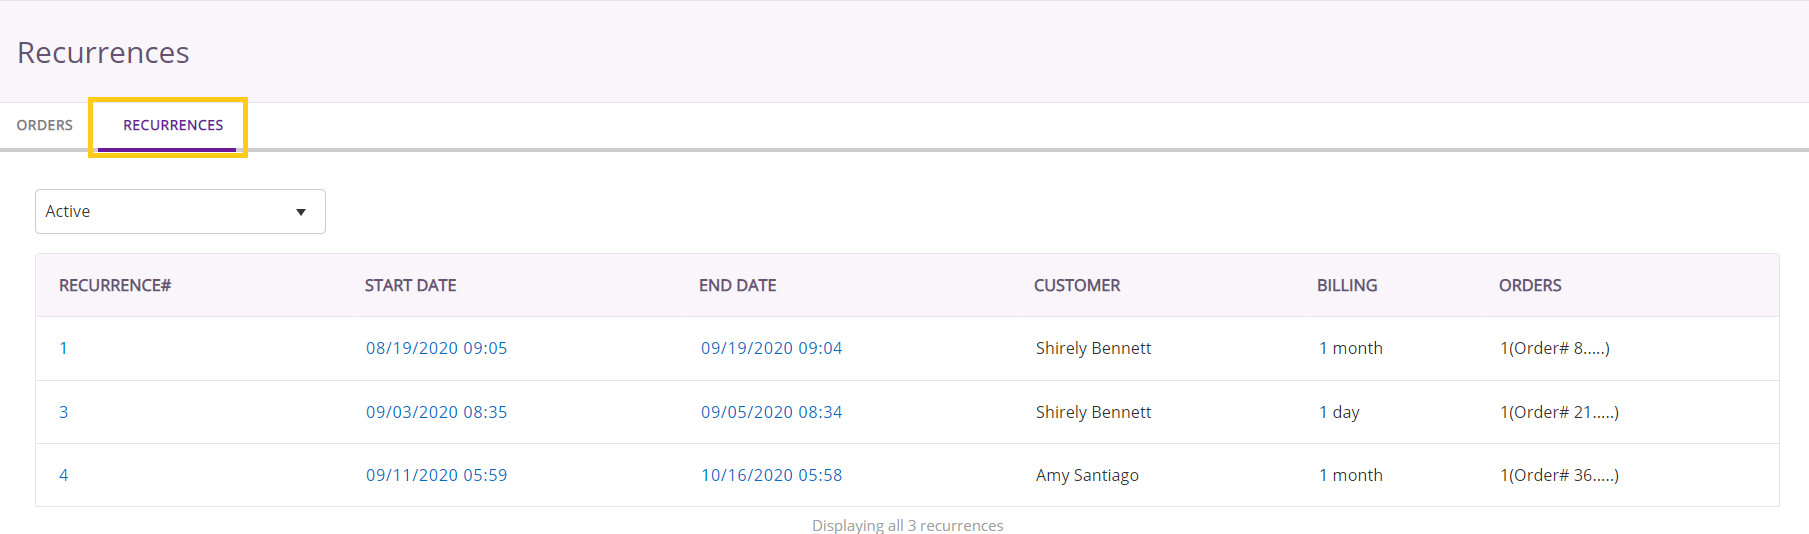
A handy way to keep tabs on all your recurrent Orders is through the ‘Recurrences’ tab under ‘Orders’. This is especially helpful if you want to be able to see the full Order and payment history for a recurrence. The Order Details page, in contrast to the Recurrence Details page, will only show the latest Orders in the recurrence, or those with pending payments
On the mobile app, instead of a Recurrence Details page, you can review this information by clicking on ‘Recurrence History’ at the bottom of any Order. Recurrences are set up on the app in the usual way, but a recurrence will need to be removed or stopped from the desktop itself.
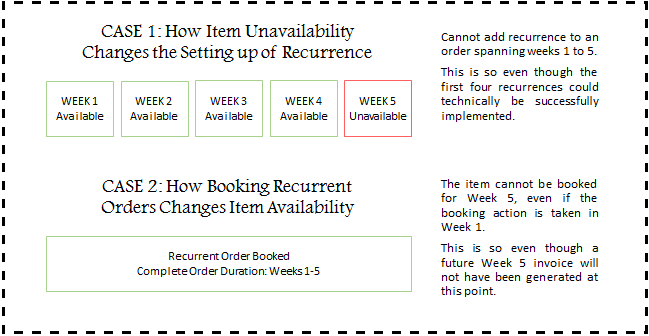
10. Making sure that items are available throughout a recurrence
When recurrence is added to a draft Order, the availability cues shown take the full recurrence period into account.
11. Reports
Data-driven businesses that prioritize analytics can make use of our in-depth Reports feature. You can generate customized reports filtered by who created the Orders, specific Customers, Order status, and the dates of Order creation and completion.
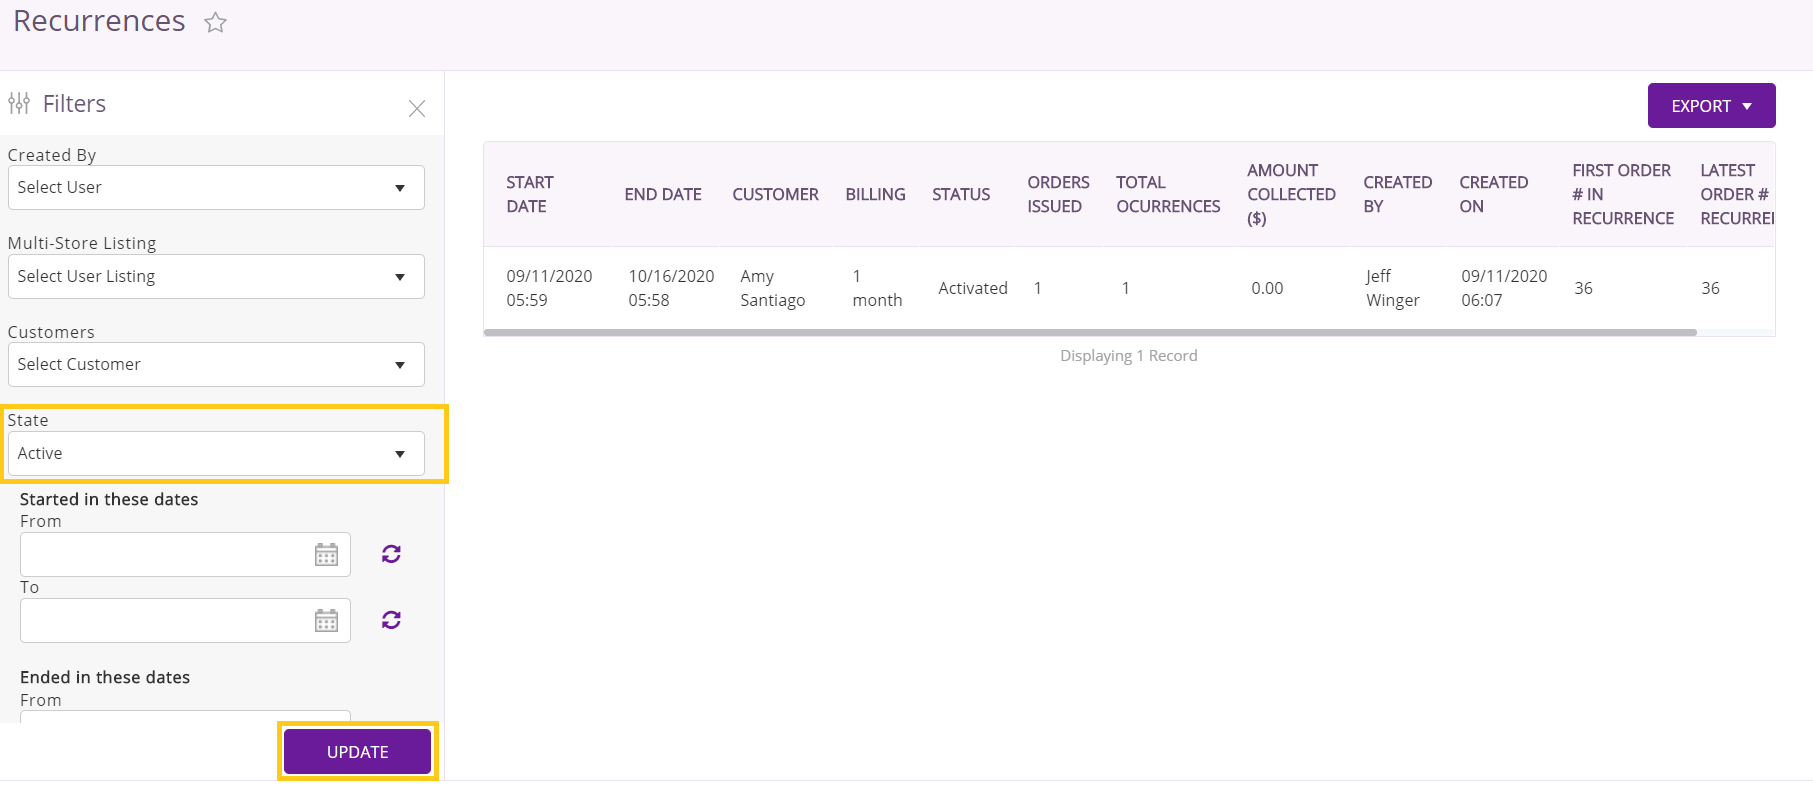
Generate reports based on your preferences. Here, we chose
‘Active’ Orders, click ‘Update’, and then scroll to see the report.
Access reports on recurrence from More → Reports → Order Reports → Recurrences.
Share your queries and feedback
For more assistance, drop us an email at support@ezo.io.


