

![[How-to] Set Up and Use the Webstore for Rentals in EZRentOut](https://ezo.io/wp-content/uploads/2016/04/How-to-Set-Up-and-Use-the-Webstore-for-Rentals-in-EZRentOut-1024x512.png)
Gone are the days of brick-and-mortar storefronts, restricted in their reach, pricing, and convenience to the customer. Webstores are the way forward, revolutionizing the way the rental industry operates, and at the same time helping businesses lower their overheads.
The EZRentalStore enhances the rental process for your customers. This blog will help you set up your Webstore in EZRentOut and show you how to modify it to best suit your business.
What does the Webstore help you achieve?
- Publish your rental and sale items online.
- Upload high-quality pictures to showcase your products.
- Customize the catalog to show preferred data points.
- Change the colors to fit your branding.
- Dedicate a special ticker/space for ‘Featured’ and ‘Popular’ items.
- Enable customers to sign in and request items for a specific duration.
- Link your website to the EZRentOut Webstore.
- Authorize online payments for customers via Credit Card or PayPal for all their previous, ongoing or requested transactions.
We’ll now take you through the Webstore configuration (See a demo Webstore here). But first, enable your company’s Webstore from Settings → Store Settings → Webstore.
1. Populating your account
Before you start with the Webstore, it’s important to know how to get set up with EZRentOut. Here’s a quick guide.
First, you’d want to populate your account with items so that they can be showcased on the Webstore. There are three quick ways to do that:
1.1. Import Items From Excel
This is a quick way to import all your data into your EZRentOut account. Learn More.
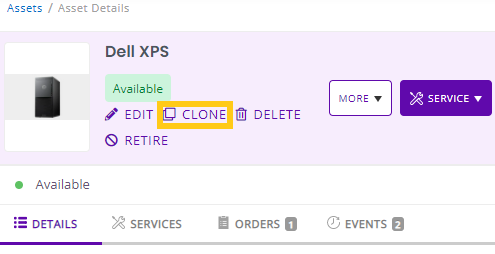
1.2. Add and Clone Items
Say you have 20 Dell XPS of the same brand and model number. You can simply create one asset and then clone it 19 times. Up to 25 cloned items can be generated at a time. Also, you can choose whether to copy the same display image or not while cloning an item to avoid the hassle of uploading images one by one later.
Note: The same steps apply to Asset Stock and Inventory items.
1.3. Change Display Pictures for Multiple Items
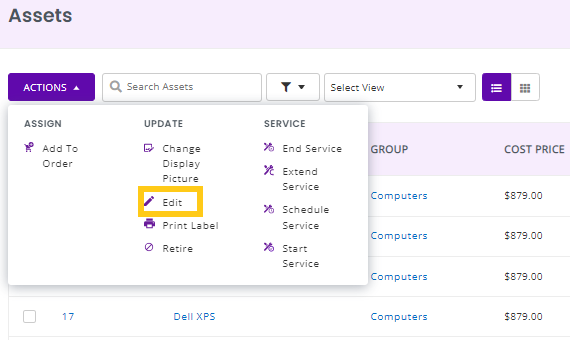
This is a simple process for both new and current users. Useful in scenarios where a mass edit is required. Say you want to upload/change the display image for an asset that has 5 similar items added to the account. Type and search ‘Dell XPS’ from the search bar and then choose ‘Assets’ from the ‘Filter Results’ section that shows up.
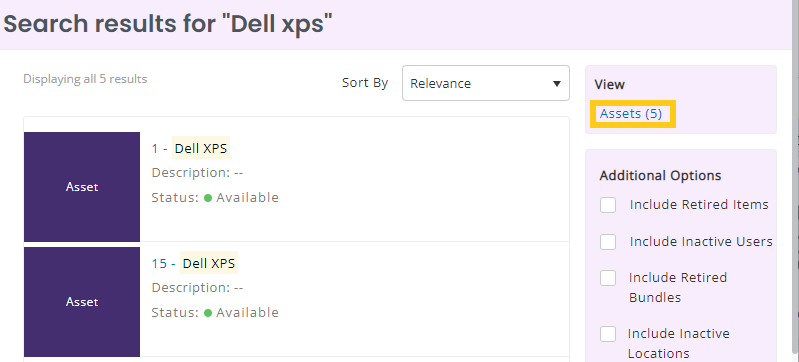
Here’s how you can then change the display images for all 5 similar items at a time (either upload a new image or choose one from the library). Select all filtered images, and click ‘Change Display Picture’ from Actions. Once you choose an image for all similar items, click ‘Update’. See image below:
2. Setting up your Webstore
Once you have populated your account with items and related data points, here’s how you can configure your Webstore. We’ll take you through the entire configuration process mentioned below:
2.1. Logo and Cover Images
Be creative and make your Webstore speak for itself. Start by uploading your company’s logo from Settings → Webstore Settings → Images on Store.
- Upload your Company Logo: It’s the graphic design element that represents your brand, which often includes your business name, initials, symbol, or even a trademark. You can also embed a URL onto the logo. This way, you can easily jump back to the home page by clicking the logo (or any other page if you embed its link).
- On-Brand Banners: You can showcase your business with either a single banner, 3 running banners, or a well-put-together video that shows what your business is all about. Design beautiful banners, add taglines or text to them, and then upload them as cover images on your Webstore from Webstore Settings. Click here to see how you can add videos to your Webstore banner, and here to learn more about which video formats different browsers support.
2.2. The About Us Page
- Text for the ‘About Us’ Tab: Tell your customers about your company with the ‘About Us’ tab. Go to Settings → Store Settings → About Us.
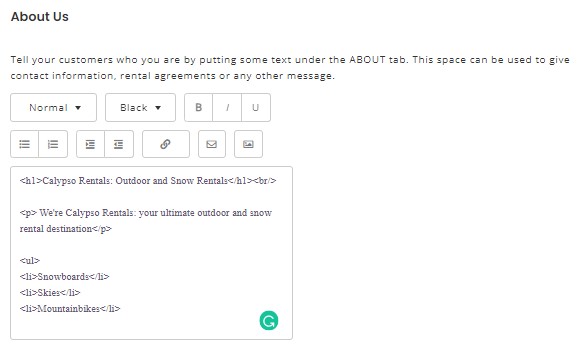
-
This space is customizable and can be used to provide a company overview, contact information, rental agreements, and terms and conditions. Use HTML to format and beautify the text. This is what it will look like:
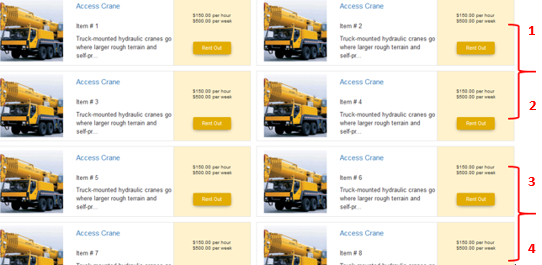
- Number of Rows Per Page: Set the number of rows you’d want your items to take on a page from Settings → Store Settings. As an example, we went with 4:
- Grouping Items with the Same Name(s): This is for assets only. You can group items with the same name so that they are displayed compactly. For example, if you have 25 similar ‘Fork Lift Trucks’ to rent out, you can simply group them as 1 listed item rather than crowding your Webstore with 24 more. A customer can always mention the quantity required while renting out an item.
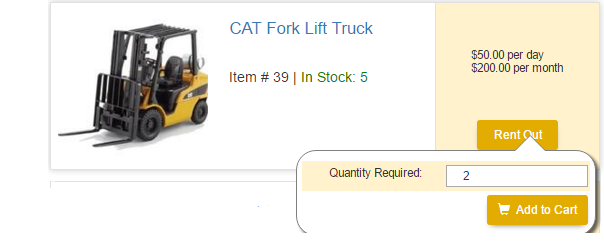
Under the same setting, you can enable the following 3 options:
a) Show the item # or AIN of the first asset with that grouped item name (see image above i.e. Item# 39)
b) Show the available quantity of items (see image above i.e. 5 in stock)
c) Restrict customers from ordering more than the quantity available in the selected period. This way the customers won’t be able to place orders for items that aren’t available for rentals. If unchecked, you will receive a booking request from the customer.
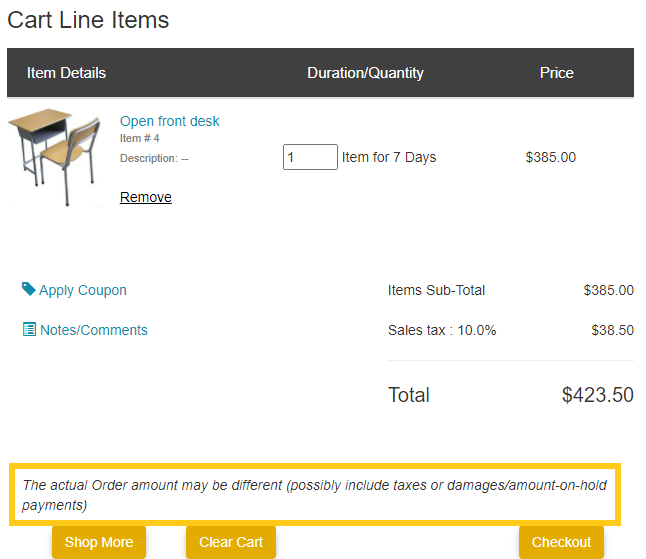
2.3. Disclaimer on the Cart
Use this space to configure a message for customers when placing or finalizing an order on the cart page. Say you want your customers to know that the actual amount payable may differ. A simple note will do the job. See image below:
2.4. Webstore URL and payments
You can easily use the URL or domain we’ve provided for your online store. Payments received on your online store using this standard Webstore URL/Domain are secure and ensure protected transactions.
You can also use your URL/Domain to access and showcase your rental items on EZRentalStore. Your customers can use this URL to rent out items online e.g. rentals.renteaze.com.
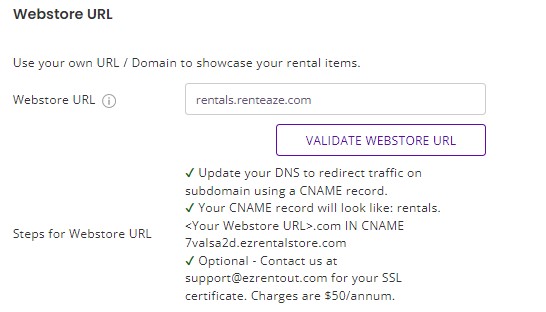
Note: Each registrar has its method of adding CNAME records. It may take several hours for your DNS change to take effect.
To enable payments through Webstore, please Go to → Store Settings→ Order Settings→ Select Enable payments through Webstore
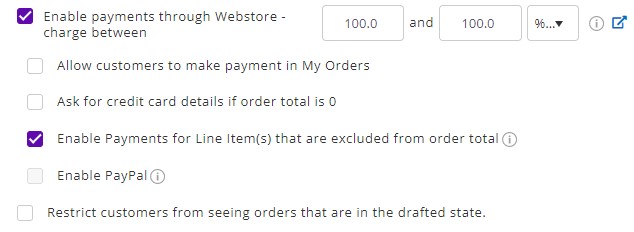
Note: Please ensure you have enabled payments through credit cards and successfully integrated with a payment gateway.
To ensure secure transactions for custom URL/Domain, please contact us at support@ezo.io for your SSL certificate.
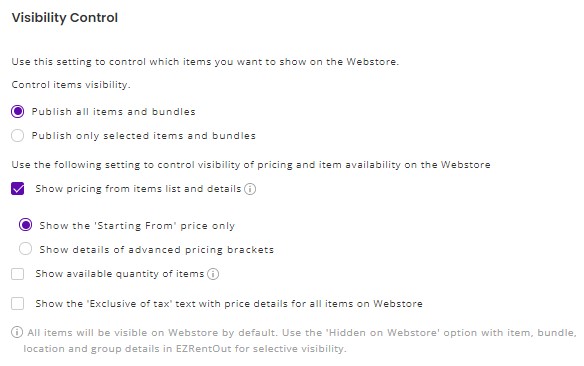
2.5. Visibility Control
Control which items you want to show on the Webstore. To get started, head to Settings –> Store Settings –> Visibility Control.
- Publish all items and bundles: Select this option to make all your items and bundles visible on your Webstore. You can use the ‘Hidden on Webstore’ option to hide select items.
- Publish selected items and bundles: Select this option to hide all items and bundles by default and make select items and bundles visible using the ‘Visible on Webstore’ option.
- Publish All Items and Bundles: Showcase all items and Bundles on your Webstore for Customers to view and add to the Order. You can still hide select items; head to Item Details Page –> Edit –> Extended Information. Here, check ‘Hidden on Webstore’ to hide the item.
- Publish Selected Items and Bundles: Hide all your items and Bundles by default and showcase select items by going to the Item Details Page –> Edit –> Extended Information. Here, check ‘Visible on Webstore’ to display said item on the Webstore.
- Make mass items and Bundles visible/hidden: To make several items visible or hidden, head to the Item Listings Page. Select items to make visible, then click on Actions –> Edit. Select the ‘Visible on Webstore’ or ‘Hidden on Webstore’ field (depending on whether you’ve published all or selected items on the Webstore) and set it to ‘Yes’. The same applies to Bundles as well.
- Show/hide pricing from Items’ list and details: Enable to show prices on the rental store or uncheck it if you’d rather send prices via quotations and proposals directly to customers.
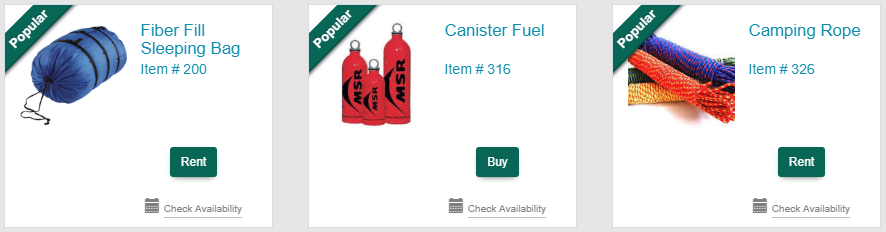
2.6. Featured Items and Bundles
This is a neat option to make your best or top-selling items featured/popular on your Webstore page. It’s also a very good option to have featured items for visitors who often view everything in a list mode. This option pops for the top-rated items and can be used to highlight low-selling items. This can also be done for bundles.
There are two options to feature items on EZRentalStore:
- Feature an Item or Bundle from the Detail Page: From the detail page, Click ‘Edit’ and enable ‘Featured Item’ from the extended information (see image below).

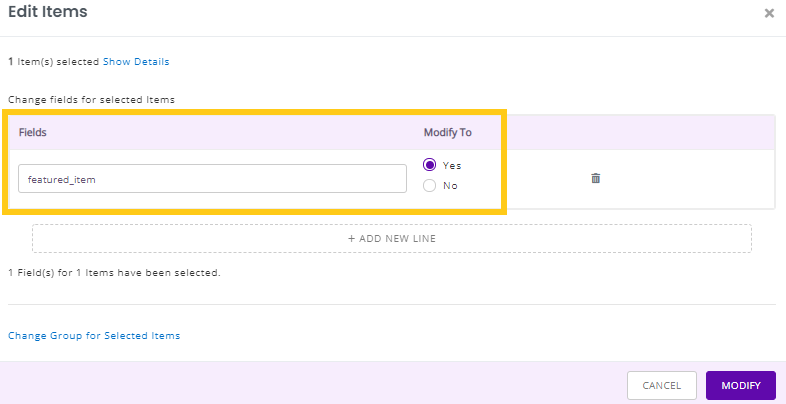
- Feature Multiple Items via the Mass Edit Action: Select multiple items from the Items Listing Page, and click ‘edit’ from the Actions drop-down button. Choose ‘Featured_Item’ from the Edit Items page and modify it to ‘Yes’ to feature the selected items. This only applies to items, not bundles.
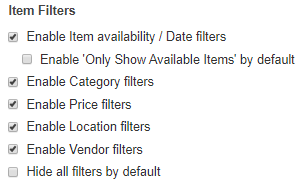
2.7. Item Filters
Use ‘Shop by Filters’ to ease up the experience at your rental store. Admins can select relevant filters from Settings → Store settings → Item Filters. Available filters include availability during the rental duration, categories (groups you add to your company account from Items –> Groups), price e.g. daily, weekly, monthly, sale items, and location, and vendors.
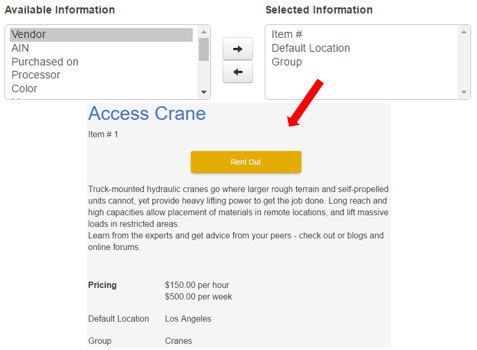
You can also choose what to show when a customer views an Item Details Page on the Webstore. Say, you want the details page to display the Item number, group, and location. All this data can be specified in Settings → Store Settings. Move as many fields as you’d like to display to the ‘Available Information’.
You can do the same for Bundles, choosing to show the number of available Bundles, any discounts applied to them, as well as all the items contained within the Bundle itself.
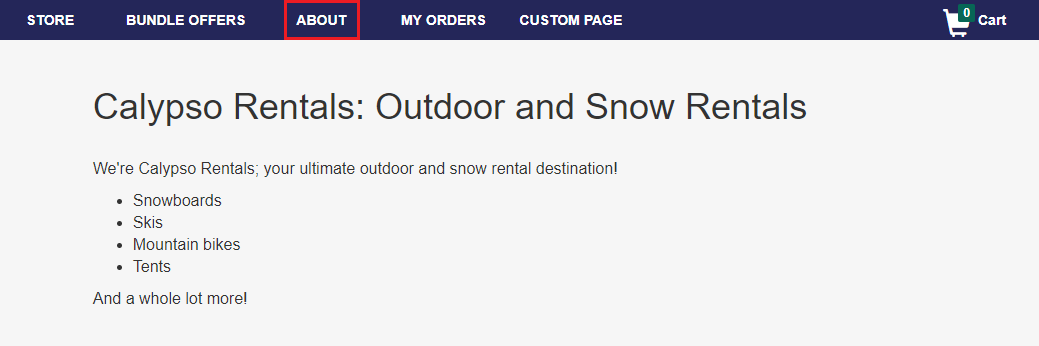
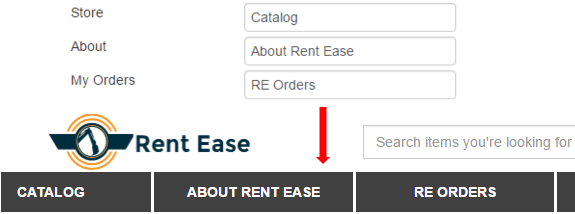
Provide descriptive names to the main menu tabs from Settings → Store Settings → Mandatory Main Menu Tabs. Fill in the fields against Store, About, and My Orders (the ‘Orders’ tab will be visible to logged-in customers only). You can also enable Bundles for the Webstore here.
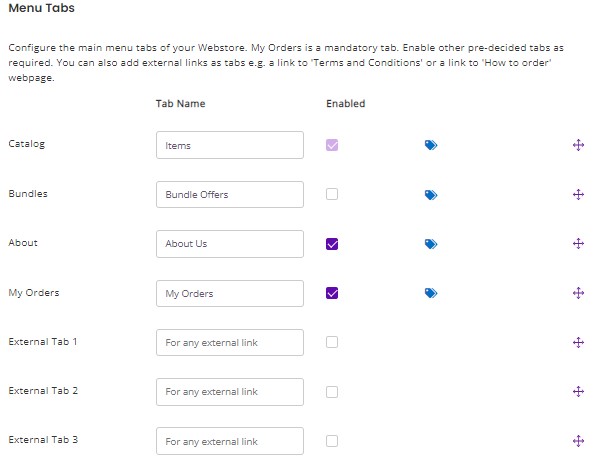
Moreover, you can also set individual Meta Tags (meaning Titles, Descriptions, and Keywords) for each of these pages.
This is what the tabs look like once you set them up:
2.9. External Links as Tabs
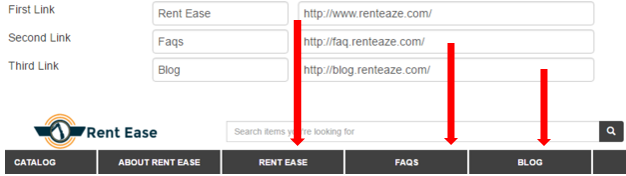
If you’d like to feature additional tabs in your rental Webstore, you can add links to external pages and redirect your customers there e.g. your corporate website, a dedicated blog site, or even detailed terms and conditions. EZRentOut allows you to add up to 3 external links to your Webstore tabs.
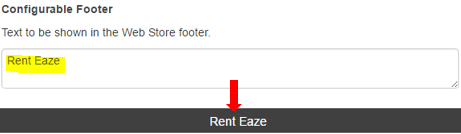
This space can be used to show simple text in your Webstore footer e.g. copyrights, email ID, or social media links.
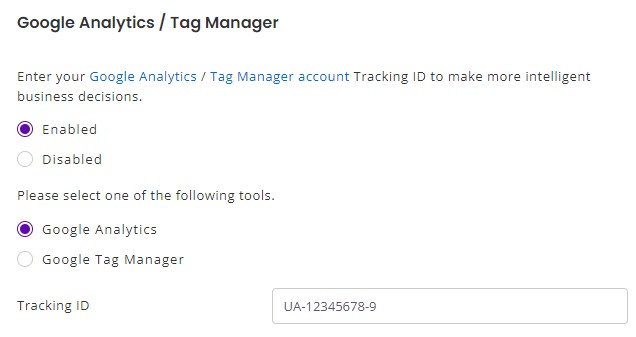
2.11. Google Analytics
Always stay up-to-date on how your rental store is performing. Measure traffic to your site with Google Analytics. You can use the account’s tracking ID to evaluate your Webstore’s overall reporting and plan strategies accordingly.
2.12. SEO Settings
SEO is a marketing discipline that encompasses both the creative and technical elements required to improve your visibility on Google, Bing, and other search engines. Additionally, SEO improves your rankings, increases awareness of your site in search engines, and drives traffic.
EZRentOut enables companies to configure their SEO Settings so they can bring their Webstore front and center in search!
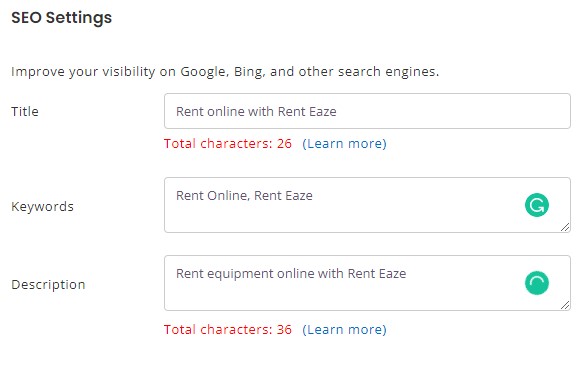
Fill out the following three key elements to configure your SEO settings on the EZRentalStore:
- Title Tag: Enter a title element that best suits your business and brand. Up to 26 characters are allowed. Learn More about title tags.
- Keywords: These act as significant and informative words that retrieve data from a search engine. You can use the Keyword Planner tool on Google Adwords to prioritize your keywords and also place bids. As an example, ‘Rent Online’, ‘Industrial Equipment’, and ‘Rent Eaze’ could be your keywords.
- Meta Description Tag: This is used to preview a snippet of the content displayed on your web page. Up to 36 characters can be entered in EZRentOut. Learn More about meta descriptions.
A Note On Domain Ownership Verification: We all know how important analytical insights are for improving that bottom line and increasing sales. For Google Analytics, AdWords, and other analysis tools, you often need to verify the ownership of your website URL. To do this, you need to add a <meta> tag to the HTML of a specified page.
To this end, we’ve added a section under Settings → Store Settings → Domain Ownership Verification:
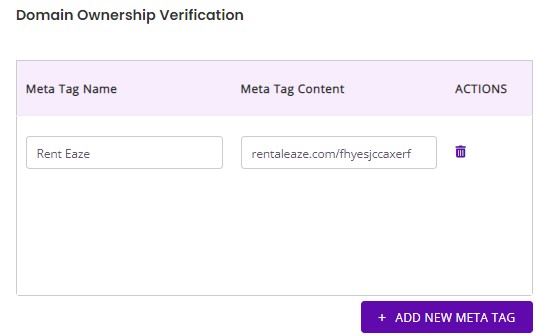
This allows you to add multiple meta tags to your main Webstore page, and easily verify ownership of your domain.
2.13. Themes
It’s important to maintain your brand consistency when building your Webstore. With EZRentOut’s Webstore:
- Customize Colors for Different Buttons and Backgrounds: From action buttons, the menu bar, and search buttons, to backgrounds and panel colors, we’ve got you covered. Pick a color that best suits your Webstore’s theme.
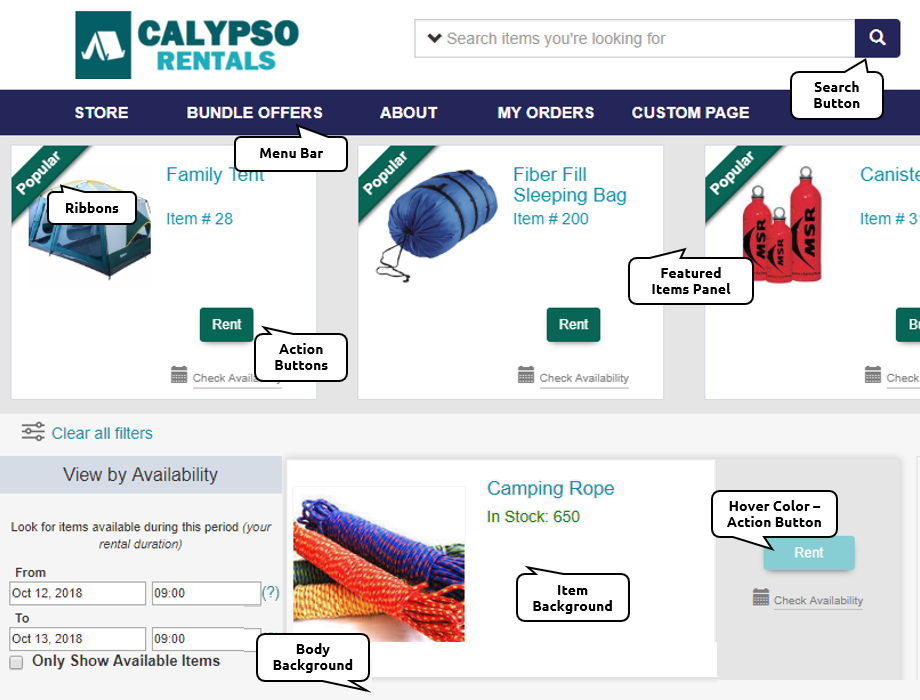
- Advanced CSS Editor: For advanced Webstore design and development, use the advanced CSS editor. Define styles for your Webstore, including the fonts, layouts, design, text alignment, borders, screen sizes, and even variations in display for different devices. Beautify your Webstore to match your preferences.
Note: You can always reset the theme to default colors.
2.14. Restricted Access

Anyone on the web can view and search your Webstore. Enable Restricted Access from Settings → Store Settings, in case you want to restrict your Webstore only to the customers in your EZRentOut account. Once enabled, a customer will have to log in to view your catalog. The customer will then be redirected to the Webstore page.
2.15. Customer Self-sign-up

Visitors to the store can sign up as customers themselves and place orders. If disabled, a new visitor will see an option to contact you via email when placing an order. Click the link and a dialog box will pop up where you will be required to provide your contact details. See image below:
2.16. Flexible Billing Duration for Webstore Orders
Businesses usually take some time to deliver a Webstore Order to their customer. Every Webstore Order requires items to be collected, packaged, and shipped so companies may not be able to ship them on the same day. Similarly, when customers return their orders, they would appreciate a grace period for comfortably preparing and shipping the rental back to you.
If companies can account for both pre-order and post-order buffer durations in their data, they can offer better value to Webstore customers by informing them exactly when to expect delivery. Additionally, companies can avoid booking conflicts by accounting for these periods of delay in their availability calendars.
For this purpose, you can set up a Flexible Billing Duration for all Webstore Orders where you can enable both Pre-order and Post-order buffer durations. Go to Settings –> Store Settings –> Flexible Billing Duration.
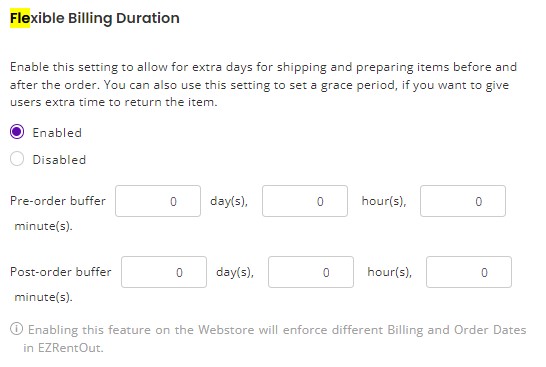
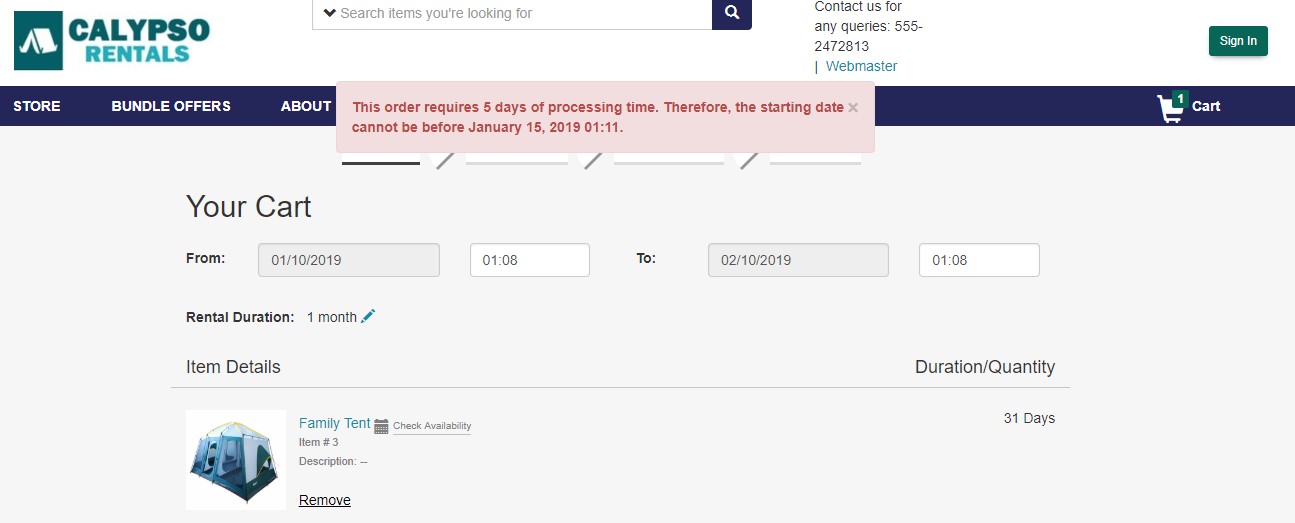
As an example, we set both Pre-order and Post-order buffer time to 5 days. A customer tries to book a rental on January 10 for 1 month starting from January 10 as well.
This isn’t allowed as per our settings so the customer will receive an error asking them to change the start of the rental period:
3. Functions on the Order Details Page
3.1. Request Cancellation
In the customer portal, customers could request cancellation of their order if they no longer wished to continue with it. We have the same functionality on the Webstore. To enable this setting, go to Store Settings → Enable ‘Show Request Cancellation’. Hit ‘Update’.
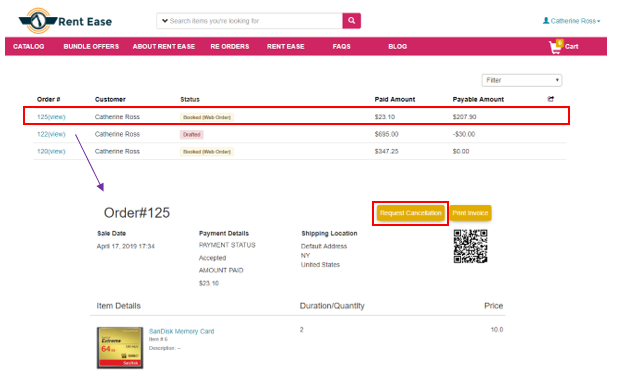
Once enabled, customers can go to ‘My Orders’ and click any order. They can view the ‘Request Cancellation’ button on the Order details page.

When a customer clicks the button, a cancellation request will be sent and further action will be taken by the company account.
Note: This setting is available for booked and drafted orders only.
3.2. Pay on the Webstore
Customers can make payment for an order on the Webstore from its details page. For this setting to play out, go to Store Settings → Order Settings → Select ‘Allow customers to make payment in My Orders’ under ‘Enable payments through Webstore…’. Hit ‘Update’. Customers can then pay online directly from the Order details page on the Webstore.
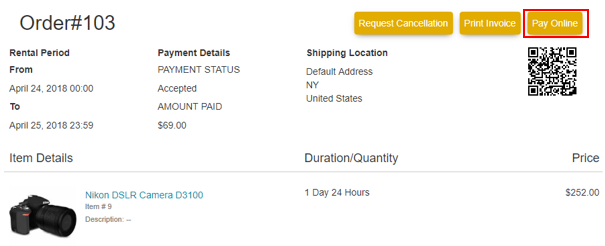
3.3. Print Invoice
Similar to the customer portal, customers can also generate order printouts on the Webstore. They can do this on the Orders Listing Page on the Webstore → My Orders → Click an Order → Hit ‘Print Invoice’ on the Order details page.
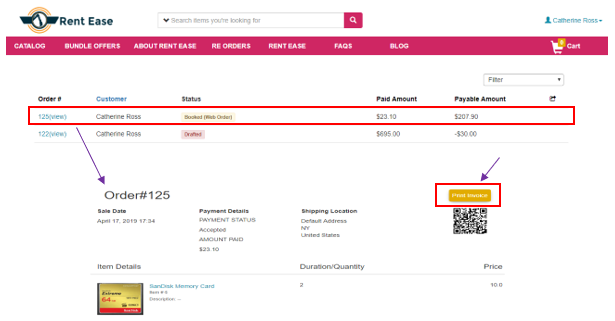
Note: You can choose which templates the customer can view and print under the Store Settings → Order Printouts.
3.4. Clone Orders
Your customers can clone existing orders and add them to their carts. A convenient way to re-use orders and save time from creating the entire cart from the start.
To clone Orders, please go to Webstore -> Sign into your customer account -> My Orders and select the Order to be cloned.
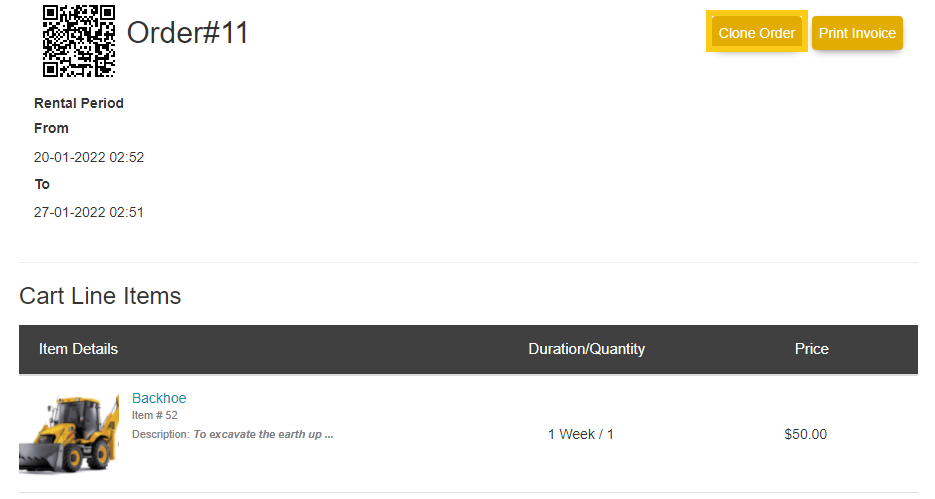
Once you click on the ‘Clone’ button, all Items in the Order will be added to the cart.
In case the cart is already filled with existing Items and you hit the ‘Clone’ button, an overlay will appear as below:
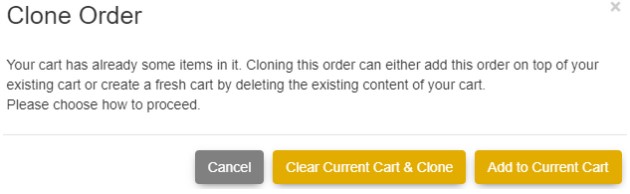
Clear Current Cart & Clone: This option will clear the existing cart and then clone all Items in the Order to the cart. For eg: If your cart already has 4 items. Now you clone Order#12 of 5 Items to the cart. Clicking the ‘Clear Current Cart & Clone’ button will remove 4 Items in the cart and add 5 Items to the cart, a total of 5 Items will be shown in the cart.
Add to Current Cart: This option will add Items in the Order to the existing cart. For eg: If your cart already has 4 Items. Now you clone Order#12 of 5 Items to the cart. Clicking the ‘Add to Current Cart’ button will add 5 Items to the existing cart, and a total of 9 Items will be shown in the cart.
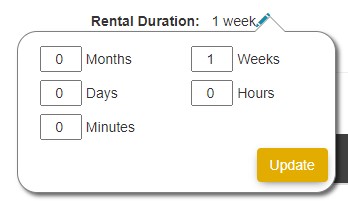
You can also change the rental durations of Items in the cart by clicking the blue colored pen on the side of rental durations:
Note: Items’ availability is a pre-requisite to cloning the Orders to the cart.
4. Selling Asset and Asset Stock on the Webstore
If you sell Asset and Asset Stock items to your customers, you can also enable selling on your Webstore, bringing in an extra layer of convenience for your online customers.
4.1. Enabling selling in the Webstore
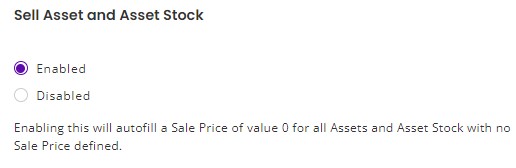
To enable this feature, go to Settings –> Store Settings –> Sell Assets and Asset Stock. Enable the setting and save it! Note that the Sell Assets and Asset Stock feature also needs to be enabled from your Company Settings before enabling it for the Webstore.
4.2. Buying through the Webstore
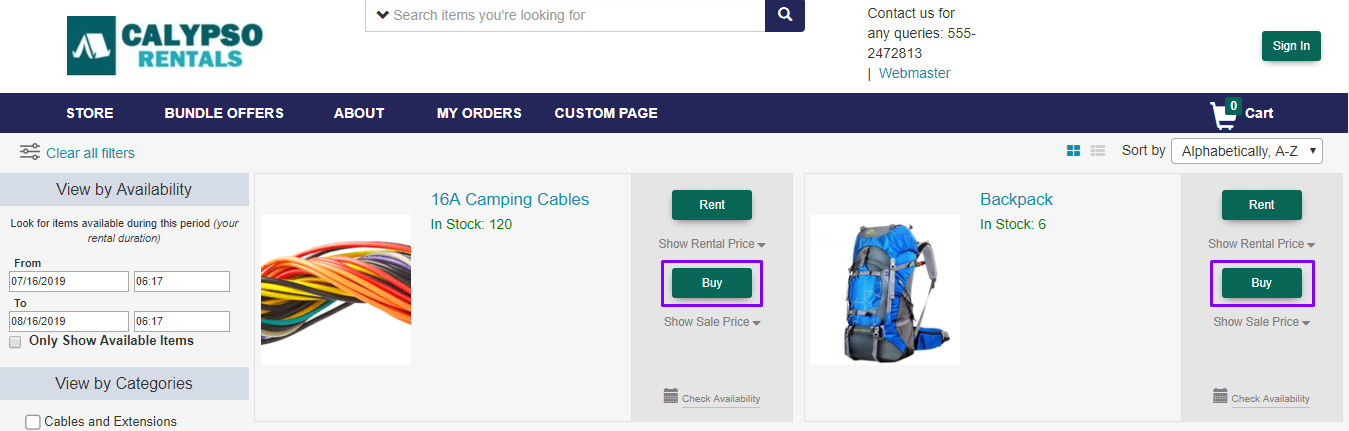
Once enabled, online visitors will be able to see a ‘Buy’ button next to the ‘Rent’ button.
Visitors can also choose to exclusively search through saleable Assets and Asset Stock. Let’s try this out.
There’s a search bar at the top of your landing page. The dropdown next to it enables potential customers to search for items to either ‘Buy’ or ‘Rent’. By default, both these intents are included.
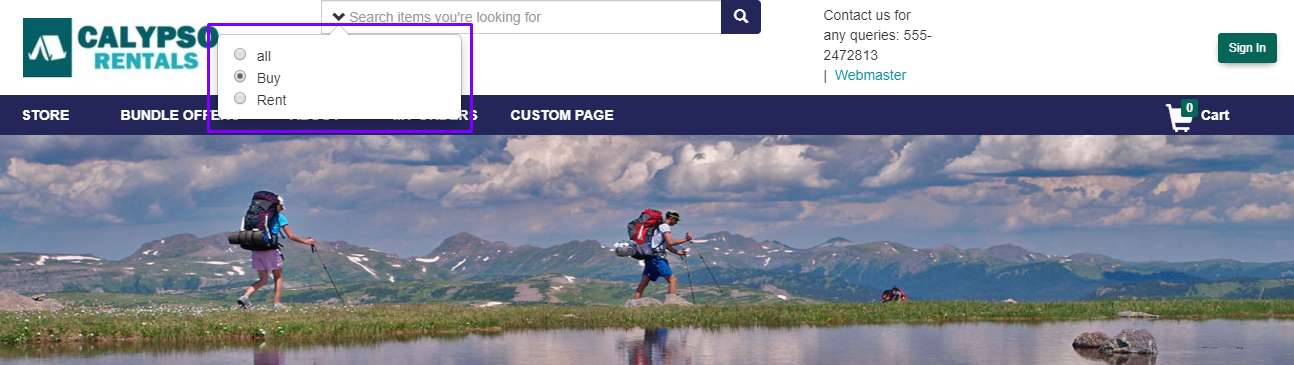
If they wish to search exclusively for items that can be bought, they will select the ‘Buy’ category and search for Assets within it.
Note: Enabling selling Assets and Asset Stock from Settings –> Company Settings also lets you specify which items to put up for sale. If you’ve selected all Asset and Asset Stock items, customers will be free to buy any Asset or Asset Stock item from your Webstore. On the other hand, if only specific items are up for sale, customers will only be able to buy from these.
For more details, read how to sell items with EZRentOut.
5. Webstore Plugin
If you’re already using a website that your customers are familiar with and don’t want to set up a new online store, use our Webstore Plugin to link your EZRentOut data with your store. With this, you will be able to add the cart checkout process to the online rental experience that you offer. This plugin also helps remind customers what they want to buy by saving abandoned Carts from their last time session.
For a detailed tutorial, learn how to sync the Webstore Plugin with your online store.
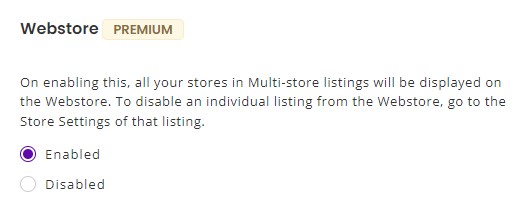
To use the Webstore Plugin, go to Settings → Store Settings → Webstore Plugin → Enabled.
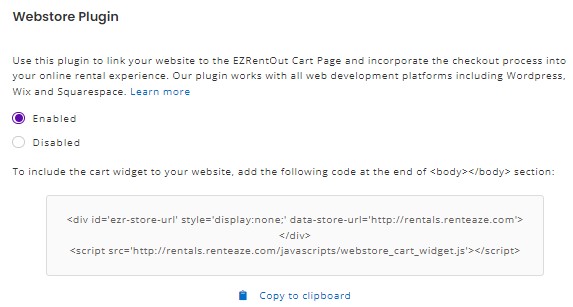
There, you’ll see widget shortcodes. Add these to the end of the <body></body> section of your website to set up the environment for the widgets.
Next, you’ll have to copy Anchor Tags from the Item Details Pages and paste them to the relevant items’ posts in your online store.
You can also customize the Plugin colors but they will be based on your existing Webstore Theme by default (found under Store Settings).

6. Setting Up Item Listings for Multiple Webstores
EZRentOut caters to companies of all sizes, from small businesses to big retail houses. As these businesses grow, customers, employees, and departments increase as well. There is a need to enforce group-based access control to better manage asset visibility and utilization within the organization. There are two ways to achieve this:
- Have separate accounts: Create separate accounts when each department and its employees are independent, or when you have multiple stores and their customers have different buying habits. For every account, you can have different policy settings and run independent reports. This works well when there is no sharing of items or employees across departments, or regions when retail companies are involved.
- Utilize Multi-Store Listings feature: This feature allows the management of departments, multiple stores, and divisions from a single EZRentOut account. Keeping a single account enables aggregate reporting and a single consistent setting across all departments and stores. If you’re interested in utilizing this feature, go to Settings → Company Settings → Policy → Enable Multistore Settings. Now save your settings. This will allow you to create item listings available for different customers and users. Learn more
7. Translate Webstore into different languages
You can now select from a variety of languages for your Webstore. Go to Company Settings →Store Settings→Branding → Choose Language
Here is an example of how it would look once translated into French:
And that’s all you need to know about the EZRentOut Webstore!
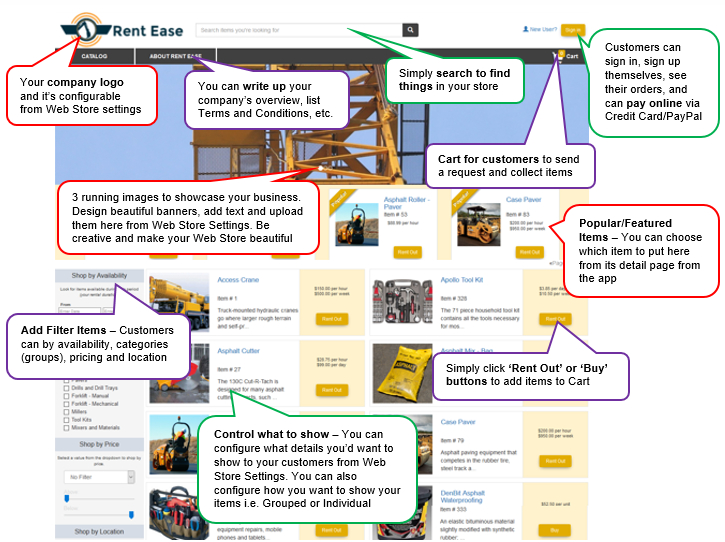
Here’s a visual summary of what we discussed above:
8. Your customer’s guide to the EZRentOut Webstore
To help your customers navigate the EZRentOut Webstore and place orders online, use our Customer Portal.
Share your queries
For more assistance, drop us an email at support@ezo.io.


